
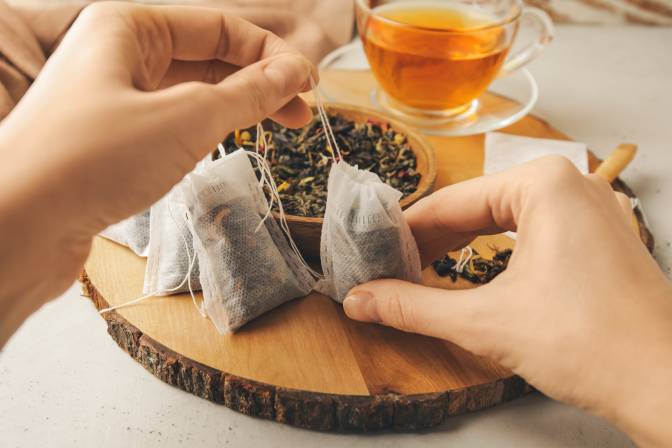
We all love a good cup of tea, but it can be hard to find a nice loose leaf tea that you can enjoy in your own home. Sometimes the cost of purchasing a bag is more than you would like to pay, and so you end up with cheap teas that are full of additives. Well, now there is a way to make your own loose leaf tea bags!
In this article, we will show you how to make your own tea bags at home. These are very easy to make and it is an excellent way of adding extra flavor to your next cup of tea!
Why Do You Need To Make Your Own Tea Bags?
The main reason why you would want to make your own tea bags is because you don’t like the taste of the normal supermarket bought tea bags. As well as this, making them yourself allows you to add additional flavors and fragrances that wouldn’t normally be available from these supermarkets.
It also gives you more control over the quality of the herbs or spices that go into each bag. This makes them much more personal and will give a better flavor for sure!
Making your own tea bags is an easy way to make a more enjoyable cup of tea, but that’s not all. In fact, they are also good for the environment. When you have made your own bag, you can save money and reduce waste. And when you look at the price of disposable tea bags in a store, it is obvious that these bags will end up in landfills.
First Things First: Materials You Will Need!
For this tutorial, you will need the following materials:
The most important thing that you will need is a pair of scissors. This is because these are needed to cut out the pattern for your tea bag. You will also need a ruler and an erasable marker. For each bag, you will need 4 inches of ribbon (for example). And finally, we recommend that you get some scrap paper as well so that you can write down how much tea leaves to use for each cup.
Now that you have all of your materials, let’s get started!
First Step: Cutting The Pattern For Your Tea Bag
The first thing that you will need to do is cut out the pattern for your tea bag. This can be done using a pair of scissors. Make sure that you are very careful with these as they are going to be the only ones that touch the teas. If they aren’t clean, then it could contaminate them.
You will also need a ruler and an erasable marker so that you can mark where each one should go in order to make it look nice and neat.
If you are going to use two layers of fabric, then mark both pieces on their own before joining them together with tape or glue. It is very important not to leave any air gaps when cutting out your pattern because this will cause your bag to leak once it has been filled with hot water!
And lastly, remember to cut out 4 inches for each cup size. This should be enough for about 4 cups worth of tea leaves (each cup needs approximately 1 tablespoon). Remember that if you have too much space at the top of your bag, then it may become difficult to fill properly once you have placed the tea leaves inside.
Second Step: Making The Cut-Out
Once you have cut out your pattern, it is time to make the cut-out. Make sure that you fold your fabric in half so that you can place the two pieces together and then fold them again. Next, press down on the top of the bag so that it becomes flat and measure from there to where you want to make a line for the seam allowance.
Draw a line across your fabric about 1/4 inch away from this point (this will become your stitching line). Then take one end of your ribbon and wrap it around itself at least twice before cutting off both ends. You should now have 2 long strips of ribbon that are each approximately 4 inches long (the size of each strip depends on how much tea bags you are making). You will need these 2 strips because they will be used later when we sew up our bags!
To sew up your bag, start by sewing along one side of the strip at an angle with some strong thread (usually linen or silk works best) which goes all the way across without leaving any gaps. If there is no gap, then mark where it has been sewn using a marker pen.
Third Step: Stuffing Your Tea Bag
When stuffing your tea bag with tea leaves or spices etc., always remember to stuff as much as possible into each corner and towards each edge because this will help prevent leaking once you have filled the bag with hot water.
And remember to make sure that the contents of the tea bag is balanced. If there’s too little leaves, you won’t get a very noticeable taste when you brew it. However, if you pour too much, it might end up tasting too strong or it might tear through your tea bag. You can use a cloth or a rough paper for this, but we prefer using some kind of fabric that won’t tear easily with the water.
Fourth Step: Sewing Up Your Tea Bag
Now that you have your bag all cut out, it is time to sew up the top and bottom edges of the bag. To do this, first take one end of your ribbon and thread it through the hole in the bottom corner so that you can then fold it back over itself at an angle and make a knot. Then repeat this process for both sides of the top edge.
Once this has been done, simply stitch along both sides with a strong thread which goes all the way across without leaving any gaps. Make sure that when you stitch through these two rows at an angle, they go from one side to another evenly.
If there is no gap between them, then mark where they have been sewn using a marker pen. And lastly, sew along both sides until you reach the end of your seam allowance (make sure not to leave any gaps!).
Done! You should have your very own DIY tea bags now!
